Making Gulay Gorod
Introduction
Gulay Gorod, or "Walking Fortress", was a particular style of portable fortification developed under a number of names and by a number of peoples bordering the steppes that flow out of Central Asia and into Russia and Poland. In territories where there were few towns or fortifications, such modular structures were chiefly used as fortified bases.
The Tabor was the fortified baggage train developed by the Cossacks and Czechs (and used with much effect by the Hussites) and adopted by the Poles. Thick wooden mantlets protected both wagons and horses, and the wagons were adapted to be both pulled or pushed.
Gulay Gorod was a Russian development and "... consisted of wood planks in a wood frame, assembled like a section of wall about 3m high and 3.5m long, and pierced with a number of firing ports. The structure was mounted on top of a four-wheel or four-ski assembly so that it could be dragged by men. Along each vertical end of the Gulay Gorod were locking devices to allow them to be secured to adjacent sections."
Source: The Strelzi (1550-1705) by Richard L. SandersRussian infantry generally did not carry pikes, which could be fatal when engaging Kazani or Crimean Tartars far out on the steppe if sufficient Gulay Gorod did not accompany the army.
Making the models
 While working on my Russian Traditional army for DBR, I gave the construction of field fortifications, or Gulay Gorod, some thought. Eventually, I came up with the following construction method:
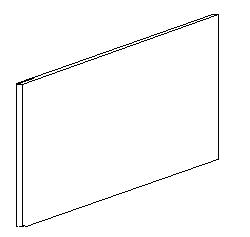
Firstly, I cut several pieces 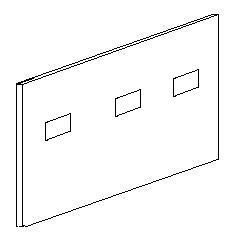 of card into rectangles 40mm (an element base width) long by 15mm wide. I used 1.5mm thick cardboard (which I also use for element bases), but plastic card would have done as well.
With a scapel, I then cut three or four small loop holes in a line across the width of the card (I ruled some guide lines on the card, first, to keep the loop holes level, and of a consistant size).
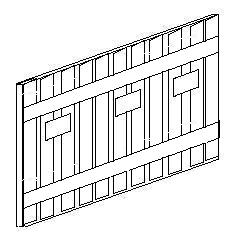 I then cut some strips of paper - 15mm long by 2mm wide - to make the planking. These were attached to the card base, on both sides, with PVA glue. I tried to leave a small gap between each plank to make them look more 'plank-like' when I came to paint them.
Four 40mm x 2mm strips of paper were then cut out and these were attached length-wise to the Gulay Gorod section, two strips each side, above and below the loop holes as if they were some form of longitudinal bracing.
Finally, a strip of 1.5mm cardboard, 3mm wide and 40mm long was cut to make the gulay gorod section base. I ran a line of PVA glue along the middle of the  cardboard strip and then placed the gulay gorod section on the base and propped it up so it could dry. This was perhaps the fiddliest part of the construction as the base strip was only slightly wider than the Gulay Gorod section and I wanted to get a 90 degree join that would allow the Gulay Gorod to be free-standing.
With the glue all dry, I undercoated the entire stucture in black, and then painted the planking with various shades of brown. I tried to use as little paint as possible so that the black undercoat would show through the gaps between the planks, giving the illusion of depth. The base strip was painted green and flocked as normal.
 In spite of being made from cardboard and paper and only held together with PVA glue, my Gulay Gorod have proved to be rather robust models. They have survived being tossed in the terrain box between battles, being bounced around the countryside in said terrain box, and show little signs of wear. And very infrequently, they have proved their worth in battle with that '+1' for fortifications. Under DBR Ver 2 they are less useful as it costs the unit lugging them around '+1' PiP to move.
Still, making them was an interesting exercise and allowed me to play around with a couple of construction ideas I have used elsewhere.