Making Ditch and Bank style fortifications
Introduction
When I decided to try the Venetian Italian Army List for DBR, instead of my more usual choice of Italian Condotta, I discovered that the Venetians could have the fortification type known as "ditch and bank".
Now wargaming operates in three dimensions: width, distance, and height. It does not operate in the Real World fourth dimension of depth, in that it is hard to represent gulleys, valleys and other depressions without raising the surface of the table in some way.
So, I was faced with the problem of constructing some form of fortification that a) conveyed the impression of depth and b) was not going to cause figures to fall over in a humourous manner when they tried to over-run, pass across or generally move around my little ditch and bank.
The Construction
I started with a standard cavalry base (40mm x 30mm for 15mm), as each piece of fortification covers the frontage (40mm) of one element (or base) of figures. The 30mm depth of the bases gave me a reasonable amount of surface area to model on.
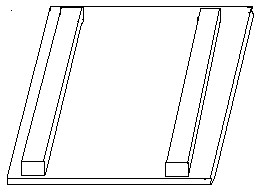 To this base, I glued two 5mm wide strips of cardboard box type corrugated cardboard. One strip was glued closer to the edge than the other. The idea was that these two strips would form the core of the 'banks' on either side of the 'ditch'. I decided to use corrugated cardboard as it is a good thickness (some 4-5mm thick), giving the 'banks' height, while being relatively light.
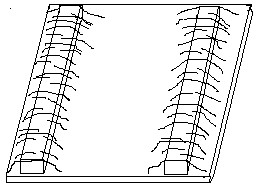 Once the glue had dried, I began to coat the corrugated cardboard with Rapidfilla, turning the strips of card into mounds. I also textured the 'ditch' to make it look dug-over.
Once this was dry, I undercoated in black and then painted the banks and ditch in shades of brown. The ground on the outer sides of the banks was painted green and flocked. At this point, the bank and ditch element was basically complete. I also made a couple of 'double-size' (80mmm x 30mm) elements for those occassions when an extended bank and ditch complex was required.
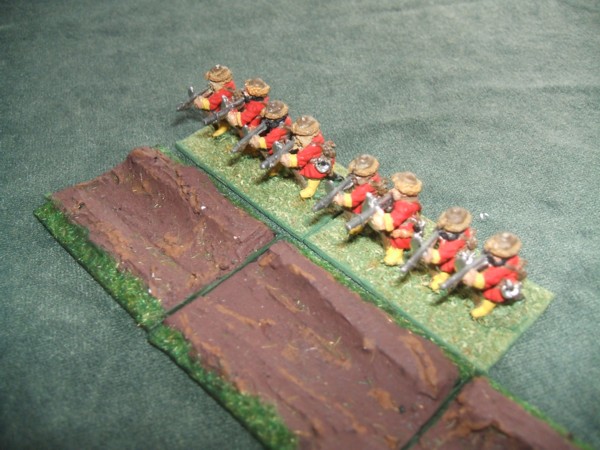
 The only drawback to this system is when used in battle, I frequently forgot that elements defending such ditch and bank fortifications can actually fire over the heads of friends deployed in front of it! If I were to make ditch and bank fortifications again, I would probably make the elements wider and build up the defenders' side a bit to give the impression of height. The problem here is that, without specific "side pieces", any increase in height of the defenders' side of the ditch and bank leaves a rather ugly 'flank side', that looks worse when several pieces are laid side by side.
I am reasonably happy with the ditch and bank as it currently exits - it performs the function of implying depth, while still providing a reasonably flat surface that figures can be positioned on. It is also pleasing to the eye, which is a good reason to make models rather than use, say, bits of string or pieces of cloth.
 |